ASE 모듈을 이용하여 결정구조 객체 만들기
jupyter notebook을 사용하는 경우를 가정하여 관련 내용을 정리하였다.
1. ASE 모듈 설치하기
먼저 Atomic Simulation Environment(ASE) 모듈과 spglib 모듈을 아래와 같은 방법으로 설치한다. 아래에 나오는 명령어드을 jupyter cell에 입력하고 실행한다.
!pip install ase --user
!pip install spglib --user
2. ASE 모듈 불러오기
결정구조를 만들기 전에 사용할 모듈을 불러온다.
#
import numpy as np
import ase
from ase import io
from ase.build import bulk, make_supercell
from ase.build import find_optimal_cell_shape, get_deviation_from_optimal_cell_shape
#
import spglib
from IPython.core.display import Image
3. 결정구조 만들기
3.1 cif (crystallographic information file) 파일을 사용하여 결정 만들기
HfO2 결정객체 만들기
결정체의 cif 파일은 The Materials Project 에서 다운로드 받을 수 있다. Monoclinic HfO2_단위셀(unit cell)에 대한 정보를 담고 있는 HfO2_mono.cif 파일이 현 디렉토리안에 있다고 가정하자.
다음과 같이 cif 파일을 불러온다.
m_HfO2 = ase.io.read('HfO2_mono.cif')이렇게 생성된 m_HfO2 객체(object)에는 단사정계 HfO2 단위셀의 셀구조(cell structure), 셀 내 원자의 위치(atomic positions) 과 셀내에 있는 원자의 원자번호(atomic numbers) 정보가 담겨있다.
print(m_HfO2)Atoms(symbols='Hf4O8', pbc=True, cell=[[5.142319, 0.0, 0.0], [0.0, 5.195148, 0.0], [-0.895046999148182, 0.0, 5.250292996273162]], spacegroup_kinds=...)# 단위 격자를 정의하는 격자벡터, 올스트롱 단위로 표시됨
m_HfO2.cellCell([ [5.142319, 0.0, 0.0],
[0.0, 5.195148, 0.0],
[-0.895046999148182, 0.0, 5.250292996273162 ]
])단위 격자내 위치하는 원자의 원자번호를 보려면
m_HfO2.numbersarray([72, 72, 72, 72, 8, 8, 8, 8, 8, 8, 8, 8])# 단위 격자내 원자의 위치, 올스트롱 단위로 표시됨
m_HfO2.positionsarray([[ 3.46179851, 2.37583989, 1.53365784],
[ 1.23299699, 4.97341389, 1.09148866],
[ 0.78547349, 2.81930811, 3.71663516],
[ 3.01427501, 0.22173411, 4.15880433],
[ 2.81404646, 3.85793249, 0.11703953],
[ 1.88074904, 1.26035849, 2.50810697],
[ 1.43322554, 1.33721551, 5.13325346],
[ 2.36652296, 3.93478951, 2.74218603],
[ 4.20903624, 1.71503265, 3.4279478 ],
[-0.40928774, 4.31260665, 4.4474917 ],
[ 0.03823576, 3.48011535, 1.8223452 ],
[ 4.65655974, 0.88254135, 0.8028013 ]
])이렇게 만들어진 결정구조에 대해 에너지 등을 계산하려면 일반적으로 periodic boundary condition(pbc) 을 적용하여야 하는데 pbc이 적용되어 있는지를 다음과 같이 확인할 수 있다.
# periodic boundary condition
m_HfO2.pbc
array([ True, True, True])# 단위 격자의 공간그룹번호
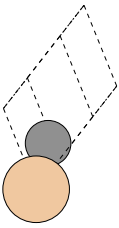
print('Space group:', spglib.get_spacegroup(m_HfO2))Space group: P2_1/c (14)이제 만들어진 결정의 단위격자를 그려보자
ase.io.write('m_HfO2.png',        # 그림을 저장할 파일의 이름
             m_HfO2,              # 결정 객체의 이름
             format='png',        # 그림파일 형태
             show_unit_cell=2,    # 단위격자의 경계선을 그릴 경우
             rotation='120y,20x', # Y 축으로 115도, X 축으로 15도 회전
             scale=30)            # 그림의 크기

# 그림을 그리기
Image(filename='m_HfO2.png')
3.2 원자로부터 단위셀 (Unit Cell) 만들기
cif 파일이 없는 경우에는, 다음과 같은 과정을 통해 결정의 unitcell을 만들 수 있다.
ase 패키지의 Atoms object를 이용하여 원자위 집합체(a collection of atoms)를 만들 수 있다.
원자의 집합체 (unit cell)을 만들려면 단위정의 크기, 단위정 내에 있는 원자, 각 원자의 위치등을 먼저 정해야 한다.
단위정 형태는 다양한 방법으로 정의할 수 있지만 다음과 같이 3개의 vecto 로 정의 할 수 있다.
Si 의 경우를 예로하자면, Sidms Diamond Cubic 구조로 cubic unit cell 내에 8개의 원자가 있다.
단위정의 크기는
aLat =  5.43095   #  Aungstron
cellShape = [ [aLat, 0, 0] , [0, aLat, 0], [0, 0, aLat] ]
단위정 내의 원자는
atomsinCell = ['Si', 'Si', 'Si', 'Si', 'Si', 'Si', 'Si', 'Si']단위정 내의 원자의 위치는
atomicPositions = [ [0,0,0], [0.5*aLat, 0.5*aLat, 0],
                             [0.5*aLat, 0, 0.5*aLat], [0, 0.5*aLat, 0.5*aLat],
                             [0.25*aLat, 0.25*aLat, 0.25*aLat], [0.75*aLat, 0.75*aLat, 0.25*aLat],
                             [0.75*aLat, 0.25*aLat, 0.75*aLat], [0.25*aLat, 0.75*aLat, 0.75*aLat]
                          ]
Si 단위결정을 다음과 같이 만든다.
from ase import Atoms
si_UC = Atoms(symbols=atomsinCell, positions=atomicPositions, cell=cellShape)
3.3 기본단위셀 (Primative Unit Cell) 구하기
단위정으로 부터 기본 단위정(primative unit cell) 을 다음과 같은 방법으로 구할 수 있다.
정의된 단위정이 앞에서 정의한 Si_UC 이고 이로부터 기본단위정을 구한다고 생각하자.
import spglib
primUnitCell=spglib.find_primitive(Si_UC)
결과는 primUnitCell 에 격자모양(cell vectors), 기본 단위셀내 원자의 표준위치(scaled atomic positions), 그리고 (일반적으로 베이스를 구성하는) 원자의 번호 정보가 담겨있다.
print(primUnitCell)

(array([[0.      , 2.715475, 2.715475],
       [2.715475, 0.      , 2.715475],
       [2.715475, 2.715475, 0.      ]]), array([[2.77555756e-17, 2.77555756e-17, 2.77555756e-17],
       [2.50000000e-01, 2.50000000e-01, 2.50000000e-01]]), array([14, 14], dtype=int32))
print(primUnitCell[0]) # Cell unit vectors[ [0. , 2.715475, 2.715475],
[2.715475, 0. , 2.715475],
[2.715475, 2.715475, 0. ] ]print(primUnitCell[1]) # Scaled atomic position[ [2.77555756e-17, 2.77555756e-17, 2.77555756e-17],
[2.50000000e-01, 2.50000000e-01, 2.50000000e-01]]
print(primUnitCell[2]) # Atom numbers[14, 14]print('Space group:', spglib.get_spacegroup(primUnitCell))Space group: Fd-3m (227)Making crystal with primative unit cell
앞에서 구한 primaticeUnitCell 는 단순 tuple 구조로 되어있어 ase 에서 사용하는 결정정보 객체와 달라 ase 함수에 사용할 수 없다. ase 함수에 사용하기 위해서는 primaticeUnitCell 을 ase 가 이해할 수 있는 구조로 변경하여 주어야 하는 데 다음과 같은 방법으로 ase Atoms 객체인 기본 단위셀 구조 객체로 만든다.
pUC = ase.Atoms(cell=primUnitCell[0], scaled_positions=primUnitCell[1], numbers=primUnitCell[2])print(pUC)newCell = Atoms(symbols='Si2', pbc=False, cell=[ [0. , 2.715475, 2.715475],
[2.715475, 0. , 2.715475],
[2.715475, 2.715475, 0. ] ] )이렇게 만들어진 격자구조 객체의 pbc 는 적용하지 않는 것으로 설정되어 있는데 pbc를 적용하도록 변경해 준다.
newCell.pbc
array([False, False, False])
# periodic boundary condition
newCell.pbc=True
newCell.pbc
array([ True, True, True])만들어진 격자구조를 그려보자.
ase.io.write('Si_pUC.png',        # 그림을 저장할 파일의 이름
             newCell,                 # 결정 객체의 이름
             format='png',        # 그림파일 형태
             show_unit_cell=2,    # 단위격자의 경계선을 그릴 경우
             rotation='120y,20x', # Y 축으로 115도, X 축으로 15도 회전
             scale=20)            # 그림의 크기

# Display the image
Image(filename='Si_pUC.png')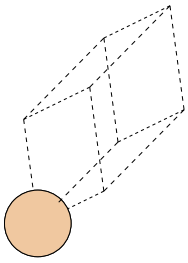
새롭게 만든 Si의 primative unit cell 이 위와 같은 모양을 갖게된다.
3.4 예제
SiC 의 결정구조 정보를 이용하여 SiC 결정 단위격자객체를 만들어 보자.
SiC 결정 만들기
SiC 는 다양한 격자구조를 띄게되지만 여기서는 입방정 구조의 SiC 를 생각해보자. SiC 단위격자
 - Bravis lattice 형대: Cubic
 - 격자상수: a=b=c= 4.3596                         # 옹스트롱 단위의 격자상수
 - 격자벡터간 각도: alpha=beta=gamma=90.0           # 격자를 결정짓는 격자축 간의 각도
 - 베이스:  Si-C,                                 # 반복되는 기본단위 (분자)
 - 원자의 위치: (0, 0, 0), (0.25, 0.25, 0.25)      # 베이스를 구성하는 원자의 격자상수 대비 위치
 - spacegroup 번호: 216,                  # International number of the spacegroup of the crystal
# SiC Cubic
a=4.3596
alpha=90.0
beta=90.0
gamma=90.0
SiC = crystal(['Si', 'C'],
[(0, 0, 0), (0.25, 0.25, 0.25)],
spacegroup=216,
cellpar=[a, a, a, alpha, beta, gamma])
print(SiC)Atoms(symbols='Si4C4', pbc=True, cell=[4.3596, 4.3596, 4.3596], spacegroup_kinds=...)# 격자상수
SiC.cellCell([4.3596, 4.3596, 4.3596])# 원자의 위치
SiC.positionsarray([[0. , 0. , 0. ],
[0. , 2.1798, 2.1798],
[2.1798, 0. , 2.1798],
[2.1798, 2.1798, 0. ],
[1.0899, 1.0899, 1.0899],
[3.2697, 3.2697, 1.0899],
[3.2697, 1.0899, 3.2697],
[1.0899, 3.2697, 3.2697]])# 원자들의 원자번호
SiC.numbersarray([14, 14, 14, 14, 6, 6, 6, 6])# 만들어진 단위격자의 공간대칭 특성
print('Space group:', spglib.get_spacegroup(SiC))Space group: F-43m (216)# 단위격자 그리기
ase.io.write('SiC.png', # 그림을 저장할 파일의 이름
SiC, # 결정 객체의 이름
format='png', # 파일 형태
show_unit_cell=2, # 단위격자의 경계선을 그릴 경우
rotation='120y,20x', # Y 축으로 115도, X 축으로 15도 회전
scale=30) # 그림의 크기
# 그림을 그리기
Image(filename='SiC.png')만들어진 단위셀은 FCC 구조에 셀내 4개의 격자점 또는 8개의 원자로 구성됨을 알 수 있다.
기본단위셀 (Primative Unit Cell) 구하기
#
import spglib
primUnitCell=spglib.find_primitive(SiC)
# 격자상수
primUnitCell[0]array([[0. , 2.1798, 2.1798],
[2.1798, 0. , 2.1798],
[2.1798, 2.1798, 0. ]])# 베이스를 구성하는 원자들(Si, C)의 격나내 상대적 위치
primUnitCell[1]array([[0. , 0. , 0. ],
[0.25, 0.25, 0.25]])# 베이스를 구성하는 원자들(Si, C)의 원자번호
primUnitCell[2]array([14, 6], dtype=int32)# 기본격자셀의 공간대칭 특성
print('Space group:', spglib.get_spacegroup(primUnitCell))Space group: F-43m (216)기본격자셀 (primative unit cell)을 이용하여 결정구조 객체만들기
다음의 명령어를 사용하여 결정객체를 만든다.
pUC = Atoms(cell=primUnitCell[0],scaled_positions=primUnitCell[1],numbers=primUnitCell[2])만들어진 기본 단위셀을 그려보자 ```
ase.io.write('SiC_pri.png', # The picture file
pUC, # The crystal object
format='png', # Format of the file
show_unit_cell=2, # Draw the unit cell boundaries
rotation='120y,20x', # Rotate the scene by 115deg around Y axis and 15deg around X axis
scale=30) # Scale of the picture
Si 기본단위정 모양
Image(filename='SiC_pri.png')